
Creative Weekends: Collar I-Cord

A veces tenemos restos de lana que nos han sobrado de algún proyecto de punto y que guardamos porque no los queremos tirar. En este tutorial os propongo utilizarlos para hacer unos collares modernos y sencillos. Para ello, os voy a a enseñar a montar puntos de manera provisional y a hacer una cuerda de punto con dos agujas de tejer de doble punta.
En inglés esta técnica se llama i-cord y fue inventada por la tejedora y diseñadora británica Elisabeth Zimmermann (1910-1999). Bromenado, ella solía llamar a esta técnica "Cuerda de Idiota" (Idiot Cord), ya que su descubrimiento fue puramente accidental. Con este tutorial aprenderéis a hacer estos collares de punto, que podréis customizar con otros tipos de hilos, texturas y piezas tubulares.
Sometimes we have many yarn leftovers from our knitting projects that we keep because we don't want to throw them away. With this tutorial I invite you to use these bits of yarn and to make with them easy, modern and stylish necklaces. The technique that I am going to show you is the provisional cast on and how to knit a tube with two doble pointed needles.
This technique is called i-cord and was invented by the british knitter and designer Elizabeth Zimmermann (1910-1999). She named it Idiot Cord due to her accidental discovery of this simple technique. I hope that I can show you with this tutorial how to do this knitted tubes and necklaces that you can customize as you wish with other type of yarn, texture and tubular pieces.

Esto es lo que vais a necesitar:
- unos 10 grs. de lana. Yo he utilizado una hilo de algodón orgánico tipo worsted.
- 1 codo de 45º de cobre. Lo podéis adquirir en ferreterías. También podéis utilizar codos de 90º.
- 2 agujas de doble punta de 5mm para hacer el I-cord y una tercera para desmontar los puntos.
- 1 ganchillo
- un trocito de hilo de otro color para montar puntos de manera provisional.
You are going to need:
- about 10yards of yarn. I have used a worsted organic cotton yarn.
- a 45º copper pipe fitting. You can find those in hardware stores and you can also use a 90º fitting.
- 2 doble pointed needles 5mm for the I-cord and a 3rd one to bind off stitches.
- 1 crochet hook
- a piece of different colored yarn for the provisional cast on.

Primero montaremos 4 puntos de manera provisional, para que, al final, podamos cerrar los puntos en los extremos del tubo de punto sin tener que hacer costuras que engrosen la unión.
1. Con el ganchillo hacemos 4 puntos de cadeneta.
2. Sacamos el ganchillo y cogemos la cadeneta.
3. Dale la vuelta y en la parte trasera de la cadeneta insertamos la aguja de doble punta debajo del hilo que une los dos últimos puntos de cadeneta.
4. Con el hilo que queremos tejer el collar hacemos un punto. Repetimos el mismo proceso en las tres uniones sucesivas tejiendo 4 puntos en total.
First we will cast on 4 stitches provisionally. That will allow us to join the two extremes of the tube with an almost seamless joint and finish.
1. With the crochet hook make 4 single chains.
2. Remove the hook and take the chain in your hands.
3. Turn it around and insert in the wrong side the doble pointed needle under the thread that connects the two chains.
4. With the yarn that we want to use for the knitted tube we make one stitch. Make three more stitches in the following chain connections.

5. Tenemos ahora 4 puntos en la aguja de doble punta.
6. Sin dar la vuelta a la labor deslizamos los puntos hacia el extremo opuesto de la aguja. Hacia la derecha.
7. Cogemos el hilo que sale por detrás del cuarto punto .
8. Tejemos el primer punto y los sucesivos del derecho.
5. Now we have 4 stitches on the double pointed needle.
6. Without turning the work we move the stitches toward the other tip of the needle. We move it to the right.
7. We take the yarn that comes out of the back stitch.
8. Knit the first stitch on the right and the three following stitches.

9. - 12. Repetimos este proceso (tejer los 4 puntos, deslizarlos hacia la derecha y volver a tejerlos)
hasta que hayamos alcanzado el largo del tubo que necesitamos.
9. - 12. We repeat this action knitting the four stitches, moving them to the right side of the needle and knitting them with the yarn coming from the back 4th. stitch again, until we reach the desired length of the tube.
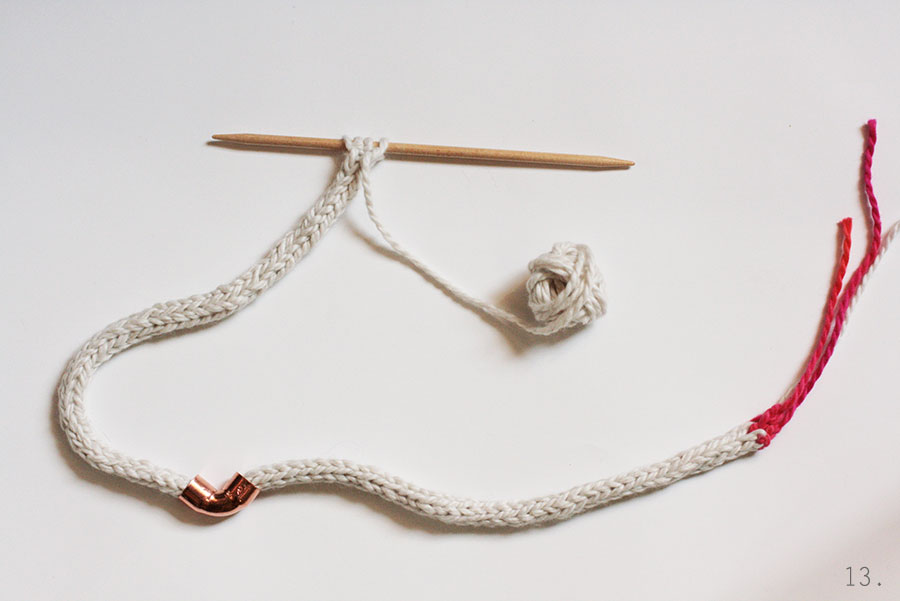
13. Para hacer este collar necesitamos un cordón de unos 62 cm. Lo mejor es que os lo probéis sobre el cuello para tomar la medida que más os guste.
13. For this necklace I have knitted a tube of about 62 cm. The best though is that you try it on and decide the length that suits you better.

Ahora es el momento de meter el cordón que acabamos de tejer por el codo de cobre y lo dejamos en el centro. Para unir el collar, primemo, desmontamos los puntos de los dos extremos a la vez con la ayuda de una aguja auxiliar. Para ello, ponemos los puntos que estaban sujetos por la cadeneta en una aguja de doble punta.
14. - 16
17. Colocamos los 4 puntos en los extremos de las dos agujas y en paralelo para poder desmontarlos juntos. Es importante que los lados derechos de ambos extremos estén colocados uno hacia el otro entre las dos agujas y que los lados del revés queden en la parte exterior.
Now we introduce the knitted tube through the copper fitting before we join the two ends. Therefore we will bind off the stitches of both sides together with the help of another double pointed needle. Before we have to place though the stitches on the crochet chain on a double pointed needle. 14.-16.
17. We place the 4 stitches of each needle parallel of each other in order to bind them off. It is important that we place the right sides facing to each other in between the needles and the wrong side at the outer side of the needles.

18. - 19 Tejemos juntos del derecho los primeros puntos de cada aguja. Tendremos un punto en la aguja derecha. Ahora tejeremos juntos del derecho el segundo punto de cada aguja. Ahora habrá dos puntos en la aguja derecha. Desmontamos estos dos puntos, es decir, pasamos el primer punto encima del segundo, como si cerraramos la labor.
20. Tejemos juntos del derecho el tercer punto de cada aguja y desmontamos un punto.
21. Tejemos juntos del derecho el cuarto punto de cada aguja y desmontamos el último punto.
Pasamos la hebra por el último punto y estiramos, acabando así la labor.
18.-19 Knit the first stitch of each needle together. We will have one stitch on the right needle. Now we knit the second stitch of each needle. There will be two stitches on the right needle. Bind off these two stitches passing the first one over the second stitch.
20. Knit the third stitch of each needle together and bind off another stitch on the right needle.
21. Knit the fourth stitch on each needle together and bind off the last stitch. Put the yarn trhough the last stitch and pull.

22. -25. Los dos extremos del tubo están ahora unidos. Veréis que por un lado (22.) habrá que rematar los hilos para cerrar la labor (24.). En el lado del derecho (23) la unión no tendrá costura y quedará bastante disimulada. (25.)
22.-25. Both ends are now knitted together. On the wrong side (22.) you will have to weave in ends with a needle (23.). On the right side the joint will be seamless (23.) and almost difficult to see. (25).
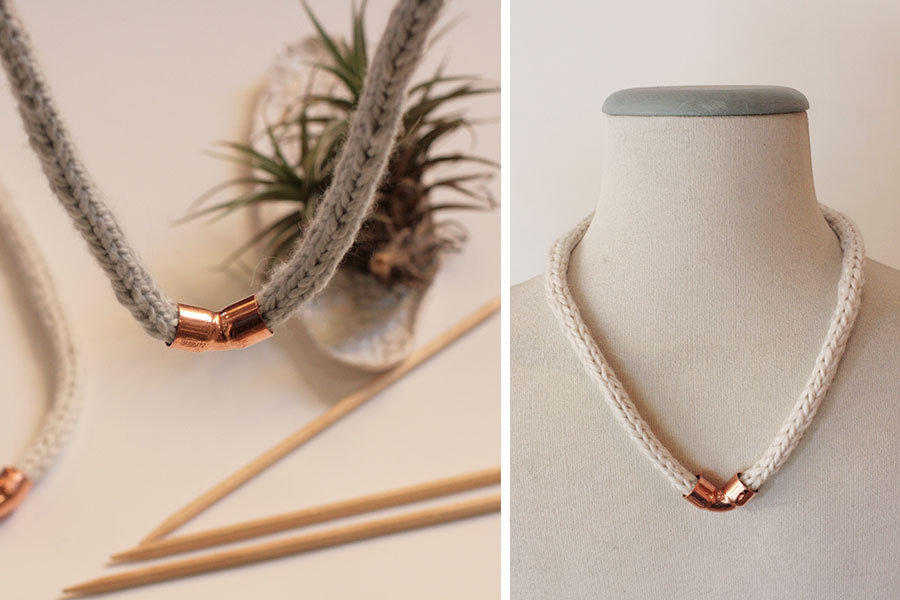
Ahora ya puedes disfrutar de tu collar y recuerda que lo puedes personalizar como quieras. ¡Seguro que se te ocurren un montón de ideas! ¿Qué me dices de utilizar un hilo de color neón o de colocar una pieza de cerámica o una cuenta de cristal?
Now you can enjoy your necklace. Remember that you can personalize it as you wish. I am sure you have lot's of ideas! ¿What do you think about using a neon yarn or a ceramic or glass bead?
